Canvas K-12 Media Center Classroom: Beginning of the Year Procedures

Copying a Media Center Canvas Classroom to a New Year

  1. In Canvas, ensure Dashboard is selected on the left.
  2. On the right, click Start a New Course.
  3. In the Create Course window, type a Course Name of your choice and click Create.
  4. On the right of the Settings, Course Details page, click Import Existing Content.
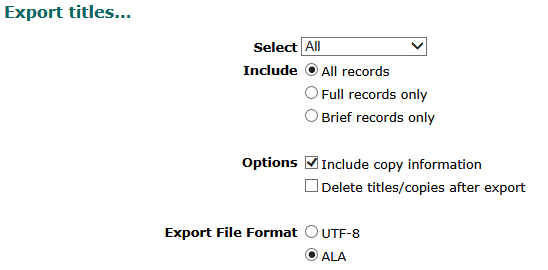
  5. In the Content Type drop-down list, select Copy a Canvas Course.
  6. In the Search for a Course box, type a few letters from the previous course. Click the course you want to copy.
  7. Next to Content, select All content.
  8. Optionally, check the Options you want to copy.  Recommendation: Select Adjust events and due dates, and then click Remove dates.
  9. Click Import.
  10. On the left, click Dashboard to access the new course.
  11. In the Unpublished Courses section, click Publish to make the course live.

Note: Keep in mind the copy process may take a few minutes to finish.  Check the imported content, delete old announcements, and update homepage information if applicable.

Enrolling Students in a Media Center Canvas Classroom

Option 1: Roster All Students

  1. In the My CCPS Portal, click Incident IQ.
  2. On the left, click + New Ticket.
  3. Click Software/Online Systems.
  4. Scroll down to Learning Applications and click Canvas.
  5. Click Enrollment.
  6. Click Need multiple users added to a course.
  7. In the Describe your issue box, type: Please roster all students from _____ School to the Canvas course titled ______ School Media Center. Include course URL.
    NOTE: The URL can be copied from the web address bar or right-click the course name on the Canvas dashboard to copy the link address.
  8. Enter your Contact Phone Number and Click Submit Ticket.

Option 2: All Students to Self-Enroll

  1. In Canvas, ensure Dashboard is selected on the left.
  2. Click the course tile to open the course.
  3. On the left, click Settings.
  4. On the Settings, Course Details page, scroll to the bottom of the page and click “more options.”
  5. Check the box next to Let students self-enroll by sharing with them a secret URL or code.
  6. Check the box next to Add a “Join this Course” link to the course home page.
  7. At the bottom of the page, click Update Course Details.
  8. On the Settings, Course Details page, scroll to the bottom of the page.
  9. Find the note reading: This course has enabled open enrollment. Students can self-enroll in the course once you share with them this URL.
  10. Copy the URL (website address) and share the link with students.


Using the Canvas K-12 Media Center Template

Importing the Canvas K-12 Media Center Template

  • Go to the My CCPS Portal and Launch Canvas.
  • Click Courses, All Courses.
  • If you already have a Media Center course listed, click the name of the course.
  • If you need to create a new course, click the +Course button at the top, enter a Course Name such as Mountain View Media Center, choose the appropriate Content License and click Create Course.
  • On the right, click Import from Commons.
  • In the Search box type media .
  • Click the K-12 Media Center Template.
  • On the right, click Import/Download.
  • In the Import/Download window, check the box next to your Media Center course and click Import into Course.
  • Within a few minutes, you should see that your course now has the template applied.

Working within the Media Center Template

  • To hide, unhide, and edit pages:
    • On the left click Pages, then click View All Pages.
    • Click the green circle with the checkmark to hide a page.
    • Click the cancel circle to unhide a page.
    • Click a page title to edit the contents of a page.
  • To change which course navigation options are visible to or hidden from students:
    • On the left click Settings.
    • Click the three dots to the left of a course navigation option and choose Enable, Disable, or Move.

Rostering the Course

  • Go to the My CCPS Portal and Launch Incident IQ.
  • At the top of the page, click +New Ticket.
  • Click Software/Online Systems.
  • Click Canvas.
  • Click Enrollment.
  • Click Need Multiple Users Added to a Course.
  • Provide the following information in the Incident IQ ticket:
    • School Name
    • Course Name (in Canvas, click Settings on the left, look for Name)
    • URL of the course homepage (in Canvas, click Home on the left, copy the website address at the top of the browser)
    • Include whether only students OR both students and faculty should be included

Printing Homeroom Lists and Rosters (Elementary and Middle Schools)

Printing a List of Homerooms

Follett Destiny Library uses homeroom codes to identify the Homeroom. Having a list of homerooms is necessary to identify the teacher assigned to each homeroom.

  • Login to Infinite Campus.
  • On the left, select Scheduling, Reports, Master Schedule.
  • For Course Name, type: HOMEROOM
  • Ensure the correct Term is selected.
  • Click Generate Report.
  • Print the list of homerooms.

The Course number shown matches the Homeroom field in Follett Destiny Library. This information can be used to identify the teacher of the section and, if desired, used to add teacher names to patron records.

Printing Section Rosters

In Infinite Campus, the Section Rosters report can provide a list of students enrolled in a homeroom. The Section Roster for homerooms can be used to verify the accuracy of patron records in Follett Destiny Library. Follow these steps to print Section Rosters reports in Infinite Campus:

  • Login to Infinite Campus.
  • On the left, select Scheduling, Reports, Section Rosters.
  • Ensure the correct Term is selected.
  • Select the Period: HR
  • At the bottom of the window, click Generate Report.
  • Click the print icon at the top of the window to print the report.

Follett Destiny – Uploading Patron Pictures – Lifetouch

The steps below can be used to upload patron pictures into Follett Destiny from Lifetouch:

Install and Export from Lifetouch ImageStream

  • Install Lifetouch ImageStream
  • On the Lifetouch ImageStream window, click Launch ImageStream
  • On the left, click the Select All button
  • In the center, click the Add arrow
  • From the main menu, select Tools, Export Wizard
  • Ensure Administrative Software is chosen and click Next
  • In the Administrative Software list, choose Follett Destiny
  • Click Browse and choose a location for the Destination Directory
  • Click Finish
  • Close ImageStream (Note: if prompted to save changes, select No)

Upload Patron Pictures into Follett Destiny

  • Login into Follett Destiny
  • Select Back Office, Upload Patron Pictures
  • Click browse and locate the saved ZIP file located in the Destination Directory selected earlier
  • Click Upload Pictures

Printing Section Rosters (High Schools)

In Infinite Campus, the Section Rosters report can provide a list of students enrolled in a course. The Section Roster for third period (high schools) can be used to verify the accuracy of patron records in Follett Destiny Library. Follow these steps to print Section Rosters reports in Infinite Campus:

  • Login to Infinite Campus.
  • On the left, select Scheduling, Reports, Section Rosters.
  • Ensure the correct Term is selected.
  • Select the Period: 3
  • At the bottom of the window, click Generate Report.
  • Click the print icon at the top of the window to print the report.

At the top of each page, the Course number shown matches the Homeroom field in Follett Destiny Library. This information can be used to identify the teacher of the section and, if desired, used to add teacher names to patron records.

Inactivating Withdrawn Patron Records

At the beginning of the school year, patrons withdrawn from the district in previous years may appear in class rosters. The Update Patrons feature can be used to inactivate these patrons. Follow these steps to inactivate withdrawn patrons at the beginning of the school year:

This procedure updates all patrons with older Card Expiration Dates to a Patron Status of Inactive.

  • Login to Follett Destiny Library.
  • Select the Admin tab.
  • On the left, click Update Patrons.
  • Make the selections as shown below:
    • Based on Global Criteria
    • For every patron….
    • Whose Card Expiration Date is 1/1/2000 to (today’s date)
    • Change Patron Status to Inactive
  • Click the Update button

 This procedure moves all Inactive patrons to a Homeroom named WITHDRAWN.

  • Remain within the Admin tab.
  • On the left, click Update Patrons.
  • Make the selections as shown below:
    • Based on Global Criteria
    • For every patron….
    • Whose Patron Status is Inactive
    • Change Homeroom to WITHDRAWN
  • Click the Update button.

Identifying a Range of Unused Barcodes

The steps below can be used to identify a range of unused barcodes in Follett Destiny Library:

  1. Login to Follett Destiny.
  2. Select the Reports tab.
  3. On the left, click Library Reports.
  4. Under Catalog — Titles & Copies, click Barcode Lists.
  5. From the select drop-down list, choose Unused Barcode Numbers.
  6. Ensure Number of barcodes is selected and enter 999.
  7. In the Starting on barcode field, enter a barcode number you anticipate being unused. This may be a guess on your part and is typically a number ending in zero such as 40000 or 52000. NOTE: Keep in mind the format of your existing barcodes and follow that same structure.
  8. Click Run Report.
  9. On the Job Manager list page, click the Refresh List button and click View next to the top Unused Barcode List report.
  10. If the range appears as a consecutive range such as 40000 – 40998, then this is an appropriate range of unused barcodes. If the range appears to be broken into multiple lines, click the List Copy Barcodes link in the breadcrumbs below the Reports tab to try another range.
  11. To reserve this barcode range for a specific vendor:
    1. Select the Back Office tab.
    2. On the left, click Site Configuration.
    3. Select the Site Administration subtab.
    4. Click the Edit icon next to Library Vendors.
    5. If the vendor is listed under Current Vendors, click the Edit icon next to the vendor name. If the vendor is not listed under Current Vendors, enter the Vendor Name in the Add Vendor field.
    6. Enter the Starting Barcode for the range.
    7. Enter the # of Barcodes for the range.
    8. Click Save.
    9. Ensure you contact the vendor with the barcode range assigned.

Adding Teacher Names to Patron Records

Patron records in Follett Destiny Library have a code assigned in the Homeroom field. The Update Patrons feature can use this field to add a teacher name to each patron record. Follow these steps to add teacher names to patron records:

Elementary and Middle Schools follow these steps:

NOTE: Before beginning, ensure you have a list showing homeroom codes and the matching teacher name. For example, HR-0118 corresponds to Ms. Teresa Hampton’s homeroom class.

  • Login to Follett Destiny Library.
  • Select the Admin Tab.
  • On the left, click Site Configuration.
  • Select the Circulation subtab.
  • Scroll down to Customize User-Defined Patron Field Names.
  • Ensure User Defined 2 is setup with the text HR Teacher and that Display in Circulation Desk is checked. Click the Save button.
  • Within the Back Office tab, select Update Patrons on the left.
  • Within the Update Patrons subtab, select the following options:
    • Based on: Global criteria
    • For every patron…
      • Whose Homeroom is _______
      • Change HR Teacher to _______
  • Next to Whose Homeroom is, select one of the homeroom codes.
  • Next to Change HR Teacher to, type the name of the matching homeroom teacher. Be certain to use a consistent naming structure to ensure reports work correctly. For example, enter Ms. Teresa Hampton as HAMPTON, T and ensure all teacher names are entered as LAST, F.
  • Click Update.
  • Repeat these steps for each homeroom.

High Schools follow these steps:

NOTE: Before beginning, ensure you have a list showing third period codes and the matching teacher name. For example, 23.032002013 corresponds to Mr. John Kinsey’s class.

  • Login to Follett Destiny Library.
  • Select the Admin Tab.
  • On the left, click Site Configuration.
  • Select the Circulation subtab.
  • Scroll down to Customize User-Defined Patron Field Names.
  • Ensure User Defined 2 is setup with the text 3rd Period Teacher and that Display in Circulation Desk is checked. Click the Save button.
  • Within the Back Office tab, select Update Patrons on the left.
  • Within the Update Patrons subtab, select the following options:
    • Based on: Global criteria
    • For every patron…
      • Whose Homeroom is _______
      • Change 3rd Period Teacher to _______
  • Next to Whose Homeroom is, select one of the codes.
  • Next to Change 3rd Period Teacher to, type the name of the matching teacher. Be certain to use a consistent naming structure to ensure reports work correctly. For example, enter Mr. John Kinsey as KINSEY, J and ensure all teacher names are entered as LAST, F.
  • Click Update.
  • Repeat these steps for each class.

Destiny Library: Exporting MARC Records

MARC records can be exported from Follett Destiny Library using the Export Titles feature. Follow the steps below to export MARC records:

  1. Login to Follett Destiny
  2. Select the Catalog tab
  3. On the left, click Export Titles
  4. Leave Select set to All to export all records or change it to select a more narrow set
  5. Leave Include set to All records
  6. For the Options:
    • Ensure the option to Include copy information is checked
    • Ensure the option to Delete titles/copies after export is UNCHECKED
  7. For Export File Format select ALA
  8. Click the Export button

export_titles

Accelerated Reader (AR) Goal Setting with Lexile Measures

Before setting goals in Accelerated Reader (AR), ensure Lexile measures are being used:

  1. Login to Renaissance.
  2. Click Accelerated Reader Independent Reading and click Preferences.
  3. Scroll down to the Class Preferences section.
  4. Click Lexile Goals.
  5. Click next to Settings for, select All Classes and Groups, and click Apply.
  6. Click Set All, check Use Lexile Measures, and click Apply to All.
  7. Click Save Changes and click Yes to confirm the change in goal settings.
  8. Click the Home button to return to the Home page.

To set student reading goals in Accelerated Reader, follow these steps:

  1. Login to Renaissance.
  2. Click Accelerated Reader Independent Reading and click Record Books and Goals.
  3. Select a Class.
  4. In the Setup Goals tab, select the Goal Recommendation that best matches the class.
    (NOTE: The grades K-2 goal model applies to the full school year, the grades 3-5 and grades 6+ goal models apply to each quarter of the school year).
  5. Click Set Up Goals.
  6. Click See Yearly Goals (if the grades K-2 model was selected) or See Goals (if the grades 3-5 or grades 6+ goal model was selected).
  7. If desired, click Edit Goals to change the goals for individual students or a group of students. Click Save Goals once edits are complete.